Welcome to eMission 
eMission is a web applicaton for managing your medical mission. It's easy and free and robust, even in difficult environments.
To explore the documentation use the icons at the top of this page

Or choose from:
Overview of eMission
Summary
eMission is a simple patient database for use by humanitarian medical missions.
- It works on most smart phones
- It works even with bad cell service or intermittent wifi
- It's really easy to use
- It's easy to add photos and documents
- The team can share the information
- Security is build in

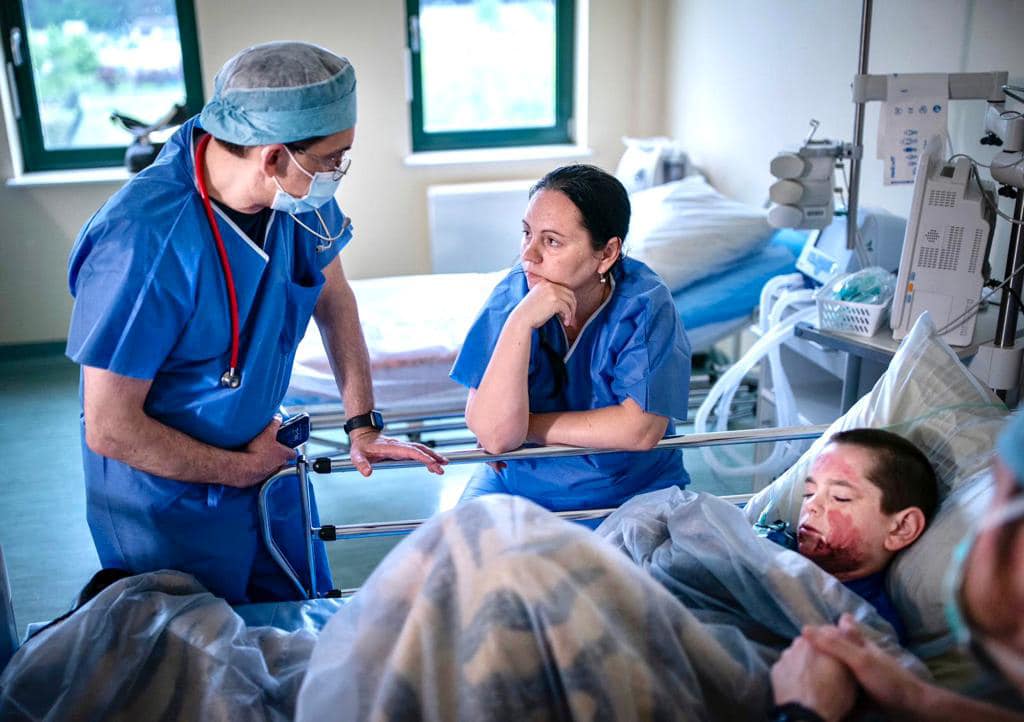
Examples:
To preserve patient confidentiality, only fictional characters are shown
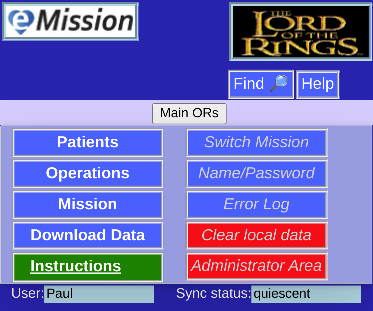
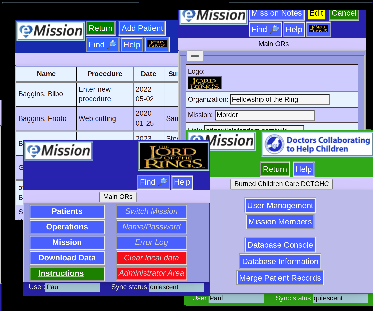
Main Menu:
You start from the Main Menu which is the jump-off point for patient records as well as some bookkeeping options.
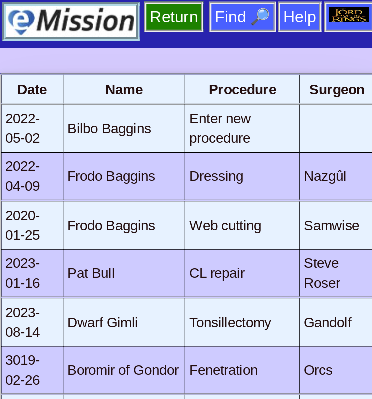
Operation list:
One way to choose a patient is to pick from the list of scheduled or completed operations.
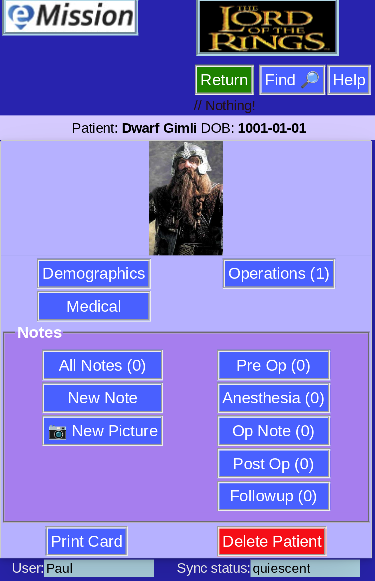
Patient menu:
Here is an example of a particular patient. You can see the operation, and enter followup pictures and updates.
Common Tasks

Once you get familiar with eMission, you will find all the tasks intuitive.
- Each page has Help to jump to a detailed description
- The layout and presentation is consistent
To get you started, a couple of common tasks are presented in detail. You can go through the steps in order, using the right and left arrow on the side of the pages.
The right and left arrow keys can also be used to move through the pages sequentially.
Getting Started with eMission
Get an invitation
There is nothing to install -- just a web page in your browser (like Edge, Chrome, Safari, Firefox, ...)
You will receive the address, user name, database name and password from your mission leader.
Possible ways are:
- An email or letter like this:
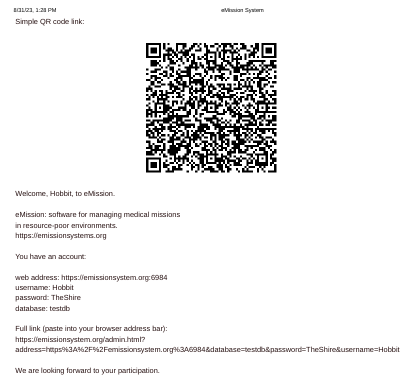
- A text with the QR code

- If you don't get a link, visit https://emissionsystem.org and you will get a chance to enter the information directly.
Get the medical records
This is automatic (but may take a little while)
The Sync status will show the current state of data transfer. quiescent when complete.
What next?
You are all set to start working with eMission -- for instance All Patients will take you to a list of patients.
Coming back
How do you get back to eMission the next time?
A local copy of the program and data stays in your browser. You can get back to it by:
- Keeping the browser tab open, or
- Reopening the tab in any of these ways:
- Add to favorites
- Look in your browser history
- Click on the original invitation again
Add A Patient
How do you add a new patient to the database?
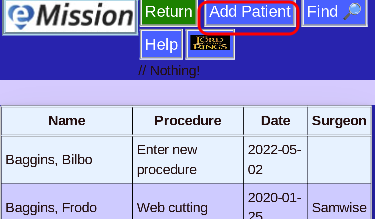
- From the Patient List choose Add Patient
- Enter new patient identifiers
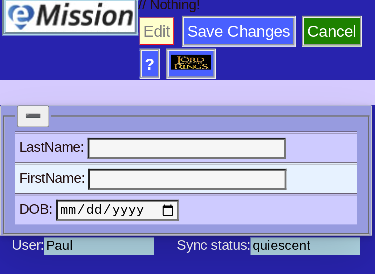
- Save Changes
- Choose Demographics
- Including a picture helps keeping records straight
- Choose Medical for information on health
- Medical info also includes fields for the operation
- Save Changes after completing record

- New patient entry is complete!
- If a printed tracking card is desired, choose Print Card

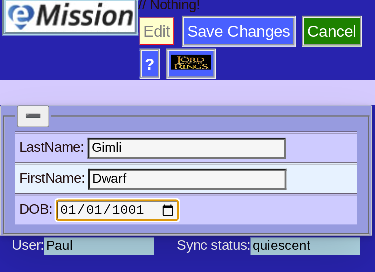
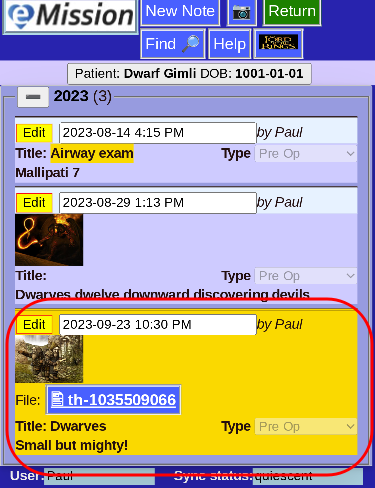
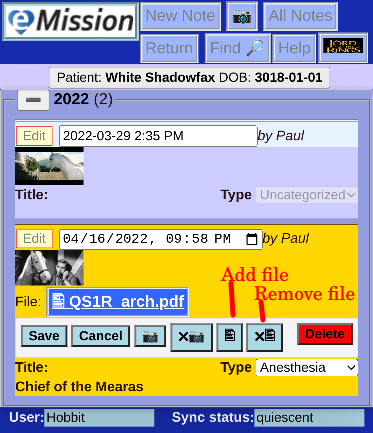
Edit A Note
Notes (and associated pictures) form an important element of the medical record. Notes are linked to a specific patient (or the mission experience).
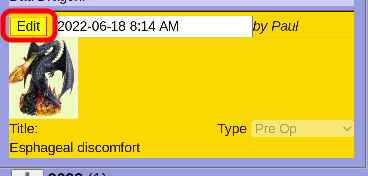
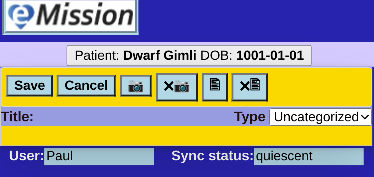
To edit an existing note, first select a note from the list:
Click Edit on the note you want to edit:
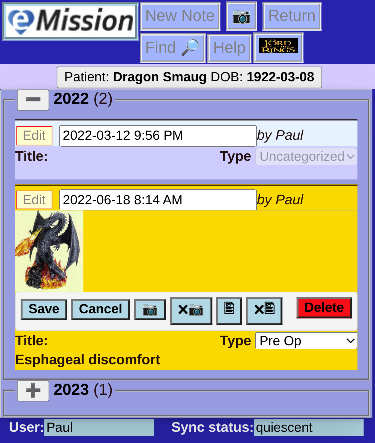
Two things happened:
- Many of the Header options are disabled during editing
- The note's display has changed, adding editing controls.
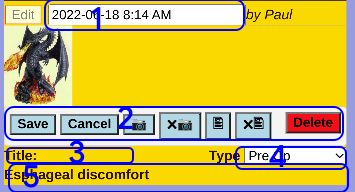
- The date field can be altered. It defaults to the date of note creation.
- A set of control buttons are displayed:
- Save your changes (and finish the edit)
- Cancel any changes
- Camera Add or change the picture
- xCamera Remove the picture
- Document Add or change an attached file
- xDocument Remove the attached file
- Delete remove the entire note.
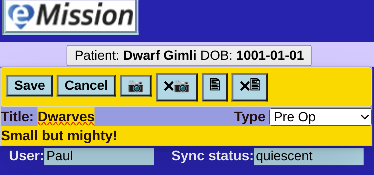
- The Note title can be edited
- The note category (e.g. Preop, Postop, ...) can be chosen
- The note text can be changed. This is free form text of any length
Troubleshooting
Program error
- Your browser doesn't support new Javascript
- Error in newest version of application
- Error in locally saved version
Try pressing "Reload" in your browser.
Connection problem
- Typically a network error
- Different colored application background
- See Background colors
Sync error
Shown in Sync box (Lower right corner) See Error Messages
Page Details
eMission is presented as separate pages (or screens if you prefer)
- The pages have a common structure
- Navigation is with menus
- Pages cover
- Patients
- Operations
- Notes
- Exporting and Search
- And more advanced Administration
Common Elements
All eMission pages have a common layout:
There are 4 main areas:
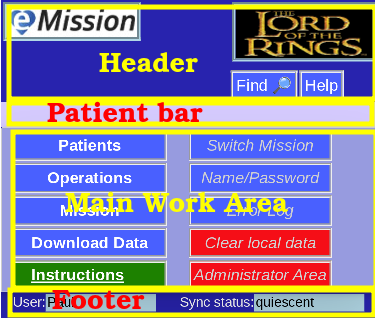
Header
This is the top area of each page. In it's simplest form:
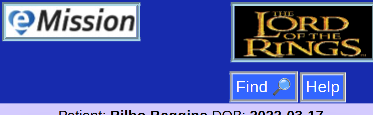
Which includes:
- eMission Button to reload the aplication and return to the Main Menu
- Mission Logo links to the organization's web site
- Find jumps to full text search through the mission database
- Help links to these instructions
On most pages, the Mission Logo will be smaller, and more options offered:

- Return usually returns to the previous page
- Save, Edit, Add may be choices depending on the context of the work area.
Patient Bar
Just under the Header is the Patient Bar

This shows the current selected patient which is especially useful when viewing notes and operations.
When editing Mission information, the Mission Name will be shown instead.
Working Area
The central space of each page is the main working area. There are several types:
Menus
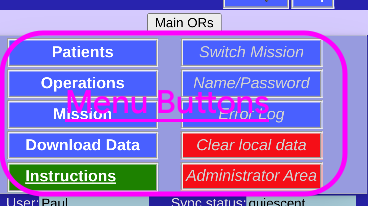
These include buttons, checkboxes and links.
Sortable Lists
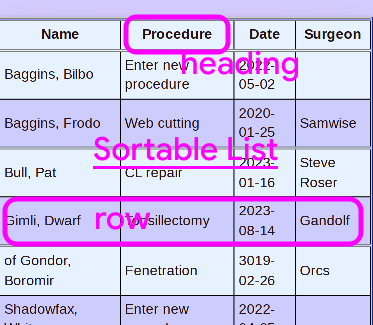
This is a list with some properties:
- Click on any heading to sort on that property
- Click again to reverse the sort order
- Click on any row to choose that item (Patient in this case) and navigate to the item
Note List
Notes are the free-form text and images that keep track of patient's progress.
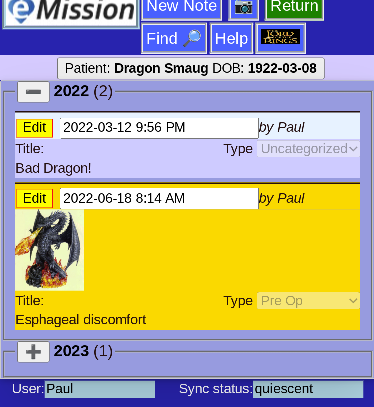
Collapsed List
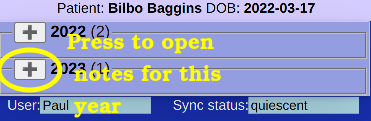
If more than one year is represented, the list is collapsed. Presse the + or - to see or hide that year.
Expanded List
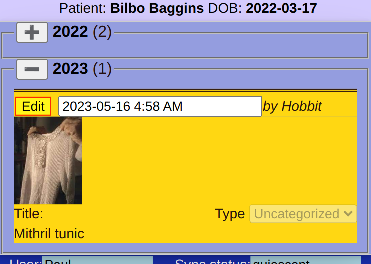
Here the (single) note from this year can be seen. It can be edited in place by pressing Edit.
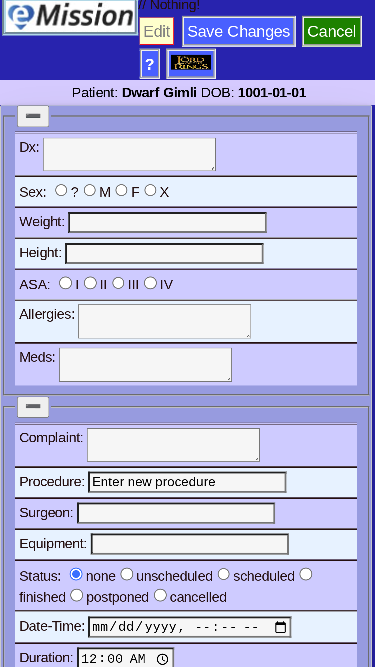
Data View/Entry
Used for viewing or entering data in a record.
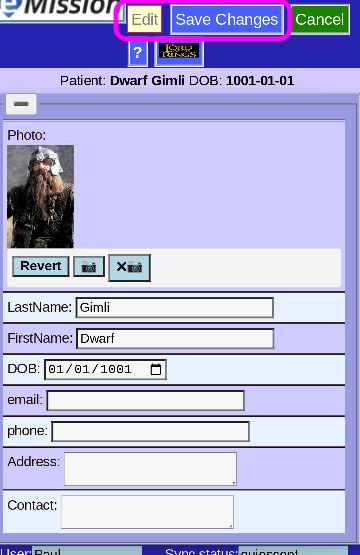
- Different types of data can be represented, including pictures, text, checkboxes, and dates
- For safety, the form comes up in view mode
- To edit, press Edit at the top
- To store your data, press Save Changes
- To Back out without saving, press Cancel
Footer
Located at the bottom of each screen, the footer:

- User is your name. The one that gives you access to the server.
- Sync status shows the latest error message or network replication status.
- Click on Sync status to quickly jump to the Error Log.
Background Color
Normal
Under normal conditions, eMission's background is a lovely blue:
Connection issue
If the network is disconnected, however (perhaps poor wifi coverage) the background changes to violet:
Permission issue
And finally, if your credentials are incorrect (or the database name or web address are wrong) this is signaled by red:
More detail can be seen in the Error Log
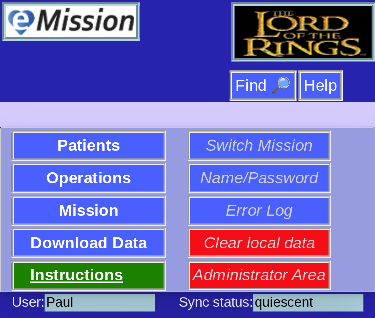
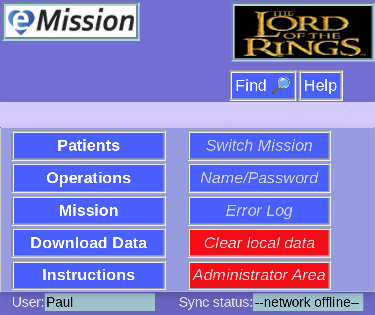
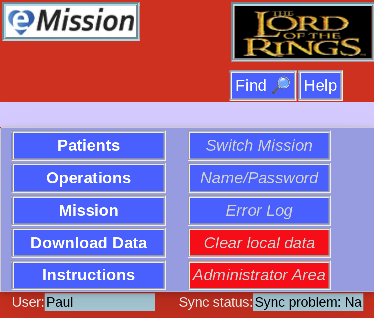
Main Menu
This is the main menu page.
The menu choices are in the center of the page.
Frequent Options (Left side)
- Patients Sortable list of all patients in the system
- Operations Sortable list of surgical operations performed or planned.
- Mission Information and notes on this Mission
- Download Data Export all data in various formats
- Instructions Link to Help System
Less Frequent (Right side)
- Switch Mission Use a different Mission database
- Name/Password Enter your credientials
- Error Log See current status report
- Clear local data Wipe Mission data off this device
- Administrator Area Edit Mission menbership and manage some database options
eMission button
The eMission Logo button in the upper corner of all pages should take you to this Main Menu
First Time Greeting
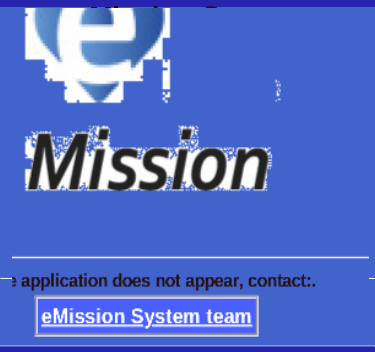
The first time you start eMission, you may see this page:

This means that eMission
- Has no stored information (cookies) about you
- You didn't start with a QR code that has you creditials
- You didn't start with a URL (from an invitation) that has credentials
If you are just exploring eMission, use Try it out in a fantasy database
If you know your name, password and other information, use Manually enter your credentials
Error Messages
When eMission seems to be acting strangely, it can be useful to view the error history and current status.

At the lower right corner is the current network status.
Click on that for the Error Log
(Or choose Error Log from the Main Menu)
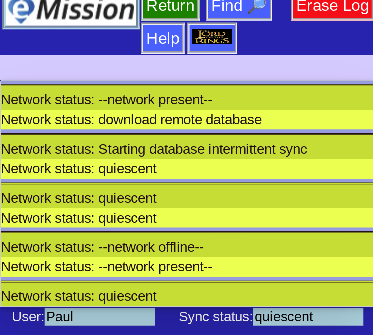
This shows the status starting at oldest (top) and newest at the end of the list.
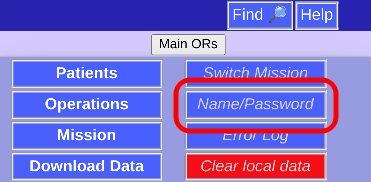
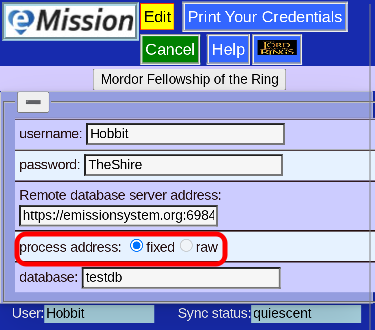
Manually enter credentials
Often your credentials (name, password, database and server) are entered automatically from the QR code or link your Mission Leader gave you.
If you need to manually enter or correct them, choose Name/Password from the Main Menu
Edit
You can Edit your information:
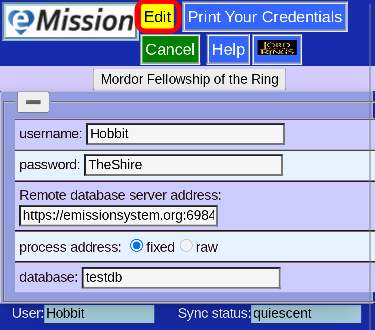
and press Save Changes
Process Address
The Remote database server address has some formal parameters that can be placed automatically
| Choice | Default | Action |
|---|---|---|
| fixed | yes | Add https(secure) and port 6984 automatically |
| raw | no | use literal address entry |
raw can be useful for some cloud services like IBM Cloudant
Alternatively, you can Print Your Credentials

And get a page for your records:
Patient
eMission is centered around patients. Their problems, operations, and progress.

Specifically, for each patient there is
- Medical and personal information
- A photograph for identification
- Operation records
- Notes of various types
- General
- PreOp
- Anesthesia
- OpNote
- PostOp
- Followup
Patient List
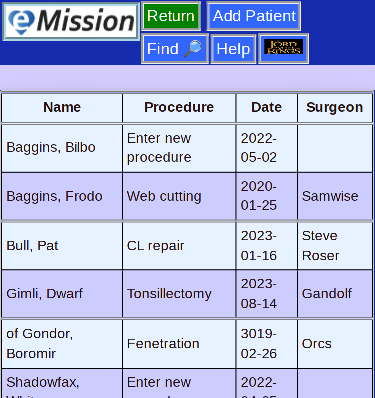
This is a sortable list of patients with the most recent operation shown.
Select any patient to see details, add information, print a card, or even delete.
There is also a button to Add Patient
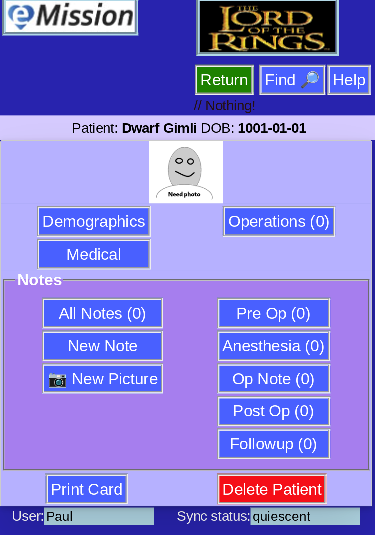
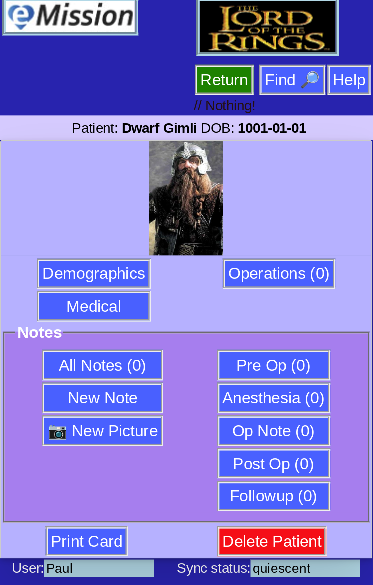
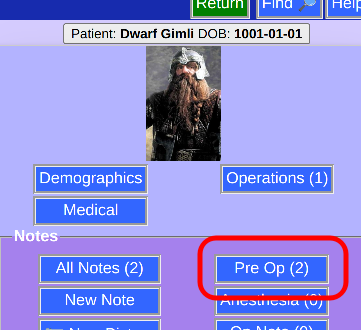
Patient Menu
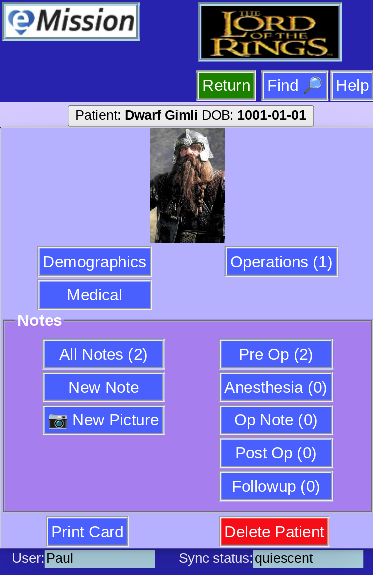
This is the main page for each patient. There are a number of choices:
- Patient information
- Demographics gives age, sex, and contact information
- Medical for medications, allergies
- Operations
- The number of operations is shown
- button advances to a list of the operations, and the change to add, delete or edit
- Notes
- All Notes shows the total number, and a full list of notes
- New Note and New Pciture are quick ways to add new content
- Note categories like Pre Op, Followup etc show the number in each category, and allow seeing a specific list
- Print Card to print a page with patient summary and a bar code link for easy patient management
- Delete Patient to eliminate this patient and all associated operations and notes
New Patient
This page is for the initial patient creation. The 3 elements:
- Last name
- First name
- DOB (date of birth)
Are for creating a unique internal ID identifying the patient's records.
A complete description for adding a new patient with all the steps including adding information, a picture and any planned procedures is found under Tasks in the Help Documentation.
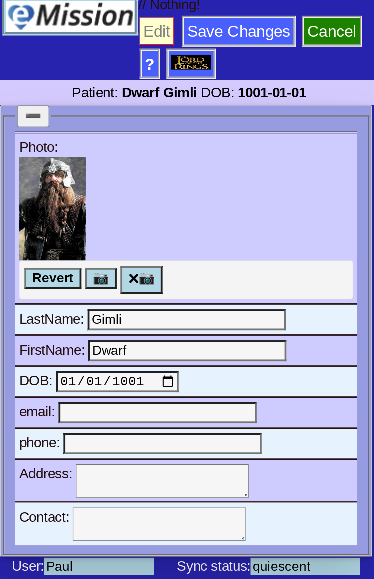
Demographics
Demographics are useful patient identifiers like name, contact information and a picture.
Edit to start adding data, and Save Changes when done.
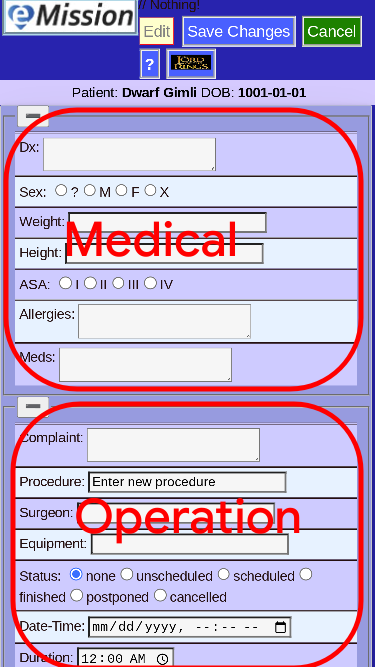
Medical Info
Here some useful medical data can be added, which may be useful for management and later mission summary.
For convenience, the first operation can also be entered. Both are shown on the page:
Bad Patient
Occasionally you may see an error page like this:
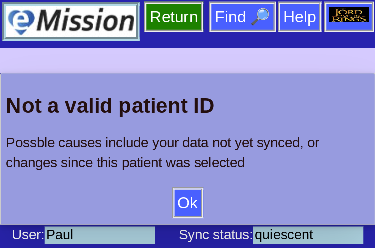
As the page says, this occurs when there is a request for data that is not in the database.
- New entries not yet uploaded and distributed
- Patient refers to a deleted record
Press Return and select a different patient
Notes
Like any medical record, notes allow for flexible documentation of the patient's condition and progress.

In eMission, notes can contain free-form text and pictures.
Notes also have:
- An associated patient (of course)
- A date (you can edit it, but otherwise the current date is used)
- A category (e.g. Pre-op, Anesthesia, Followup, etc)
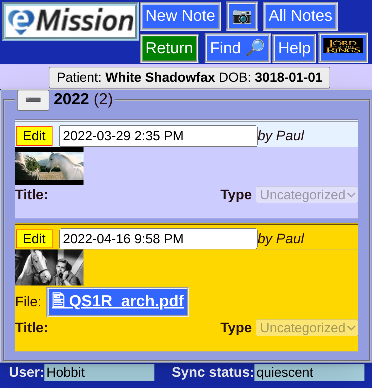
Note List
Use this page to view existing notes.
- The notes will be on the patient shown in the Patient Bar
- Depending on which list was chosen, this can be all notes, or just a certain category (like "Pre-Op")
- There are buttons to add a new note or photo in the page header.
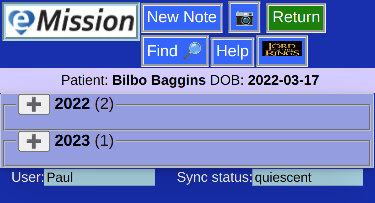
Multiple years
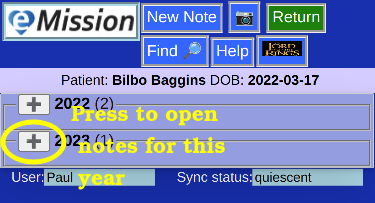
- If more than one year is represented in the notes, (i.e. subsequent missions or yearly followup) the note list will be presented collapsed
- The year and the number of notes in that year is shown
- Click on the "+" button to open a given year
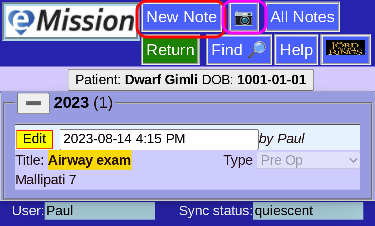
Single year, or year selected
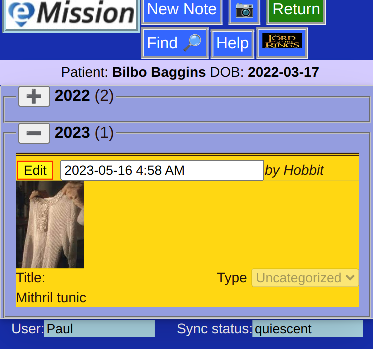
- For a single year, the note list is aleady expanded
- Each note can be read directly
- To edit the note, press the "Edit" button
Note List -- Single Type
You can view notes of a single kind from the Patient Menu
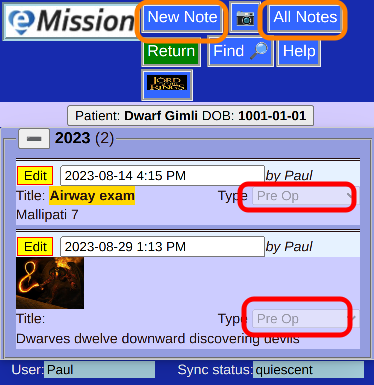
This brings the list of notes (notice that they are all "Pre-Op" in this case) that can be edited
To "break out" and see all notes. choose All Notes
Also a New Note will be of this type (Pre-Op) by default.
New Note
Starting a new note
There are 2 ways to create a new note or photo:
From the Patient Menu
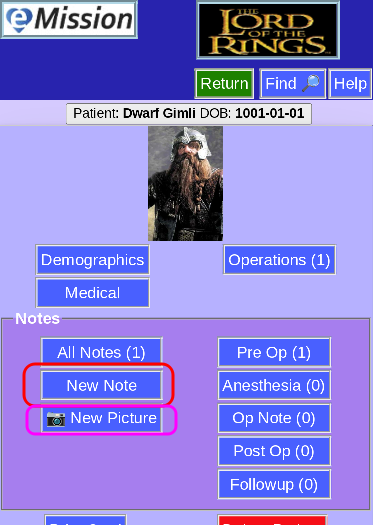
or from the Note List
Adding content
Once started, all the fields of the note can be added including
- The initial edit display
- Add text, category and title
- Add a document
- images
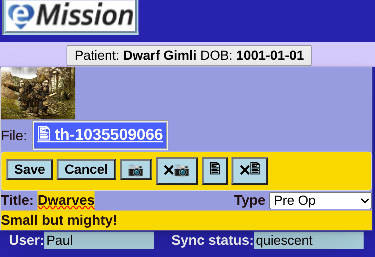
Press Save to add the note
New Photo
Adding a new note
There are 2 ways to create a new note or photo:
From the Patient Menu
or from the Note List
Adding content
Depending on the device you are using:
- Camera or gallery will be opened
- File area will be shown
Take a picture, or select the existing image you want to use.
Edit An Existing Note
Notes (and associated pictures) form an important element of the medical record. Notes are linked to a specific patient (or the mission experience).
To edit an existing note, first select a note from the list:
Click Edit on the note you want to edit:
Two things happened:
- Many of the Header options are disabled during editing
- The note's display has changed, adding editing controls.
- The Date field can be altered. It defaults to the date of note creation.
- A set of control buttons are displayed:
- Save your changes (and finish the edit)
- Cancel any changes
- Camera add or change the picture
- xCamera remove the picture
- File to attach a document (e.g. a pdf file)
- xFile to remove the attached document
- Delete delete the entire note
- The Title can be edited -- free form text
- Choose a category
- Edit your text -- free form text of any length
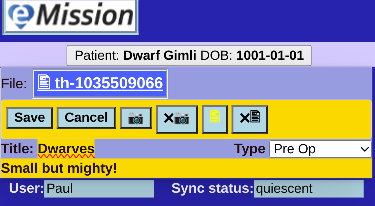
Add Documents
Notes can also include an attached document (as well and text and picture).
When a document is stored in a note, it will appear in the File line.
Appearance
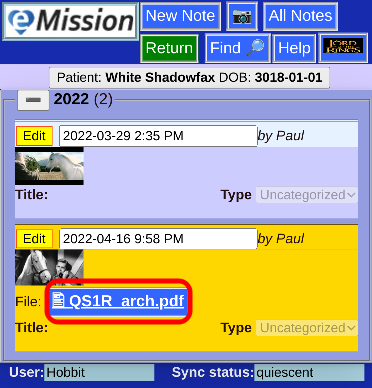
You can click on the document to download it.
Adding/Deleting documents
When editing a note (press the Edit button)
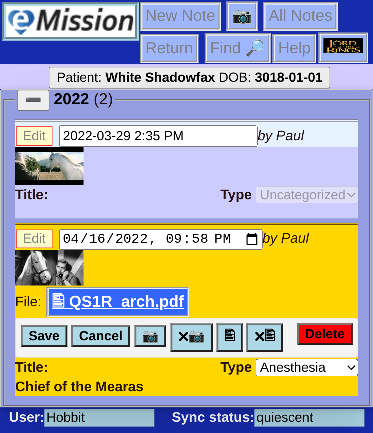
There are some special buttons for adding and removing the document.
Operations
- Operations are a key part of many medical missions.
- Operations planned or performed should be entered
- Several fields are available (equipment, surgeon, laterality, ...)
- More detail and photos should be added as notes, e.g.
- Operative Notes
- Preop Notes
- Followup
- If no operation was yet done of planned, an placeholder operation Enter new procedure will be present
Full Operation List
A full list of operations. Click on one to review or edit.
- Each Operation is listed
- If a patient has no planned ot completed operations, just the placeholder Enter new procedure is shown
Operation List (for a specific patient)
From the Patient Menu, Operations will give a list of operations.
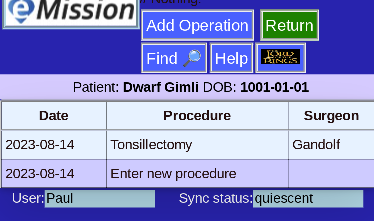
- Click on the operation to review or edit
- Use the placeholder Enter new procedure to add an operation
New Operation
Adding an operation is a choice from the patient's Operation List
It's also possible to add an operation directly when inputting medical information on a new patient.

Basically a blank operation needs to be edited (press Edit)
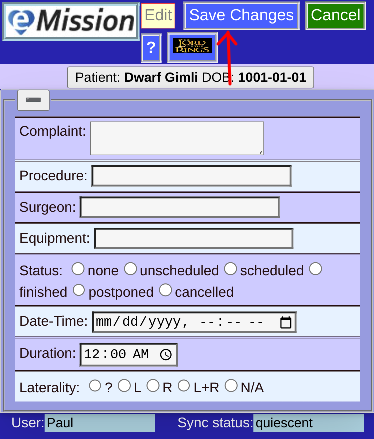
Save Changes when done
Operation Edit
Choosing an operation will show the details

You have the options to Delete Operation or Edit
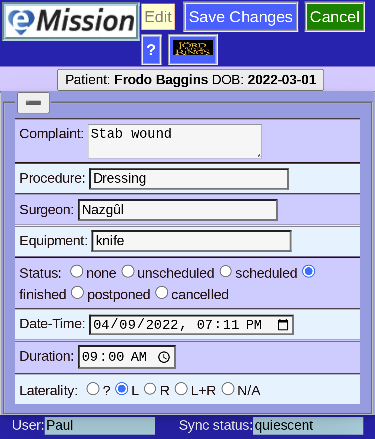
Once editing, the choices change. Save Changes to keep your work, or Cancel to make no change.
Mission Information
Each mission (which can span several years) should have general information included.
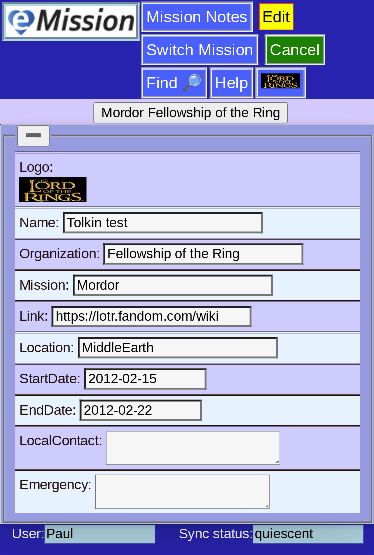
Pressing Edit lets you add important items (like the logo which helps branding and quick identification)
Other options include
- Mission Notes Notes and photos that apply to the whoe mission rather than a particular patient
- Switch Mission change the database for another one
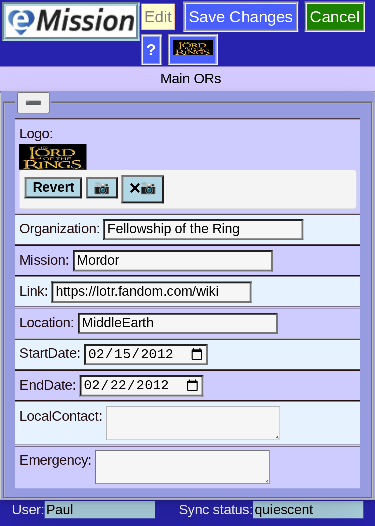
Remember to Save Changes if you are satisfied with your entries
Mission Notes

Just line Patient Notes, these are free text entries or pictures about your mission.
You can include
- Information on protocols and resources
- Pictures of the facilities, hosts, and participants
Switch Mission
Although this shouldn't be a frequent occurrence, you can switch to a different mission.
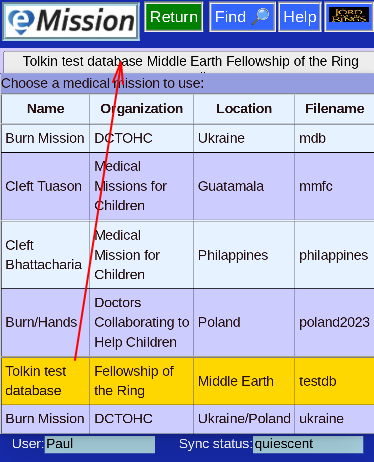
Note the the current mission is highlighted, and shown in the top bar.
- You will need access permission to the new mission to get it's data
- You will need internet connectivity and time to download the new mission data
Search
Every page has a Find button  which takes you to a database search page.
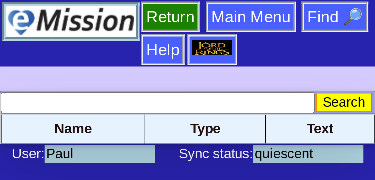
Enter the word or phrase and press "Search". All the text fields in the Mission will be examined.
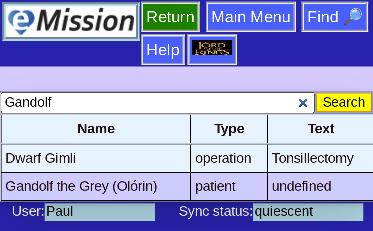
The records matched are shown. Click on any of them to jump to that page.
In this case, you can see that Gandolf matched two different types of records.
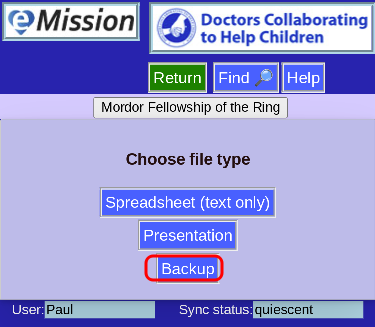
Download Menu
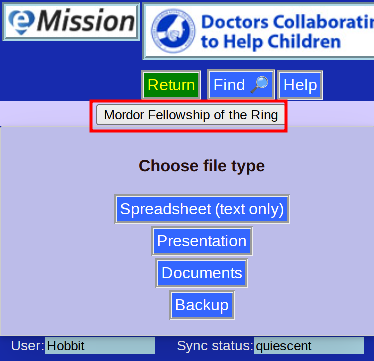
There are a number ways to get Mission information in a form usable for other programs
- Spreadsheet
- Useful as input into Excel
- Pure text
- CSV (comma-separated-values) format
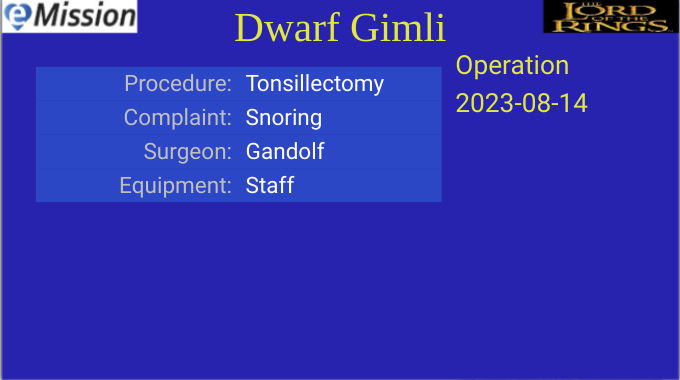
- Presentation
- Useful as PowerPoint input
- PPTX format is a standard interchange
- Presented as one record per slide
- Archive
- Contains all non-text elements
- Organized by patient
- Zip format
- Backup
- This format is raw JSON
- Usable as input into Couchdb and possibly others
- Images are included as Base64 text
Speadsheet
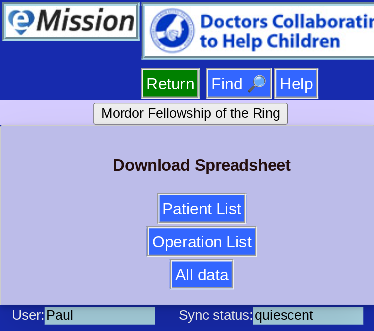
- Useful for spreadsheets like Excel
- Purely text -- no images
- Uses an old and stable standard: CSV (comma separated values)
Presentation (PowerPoint)
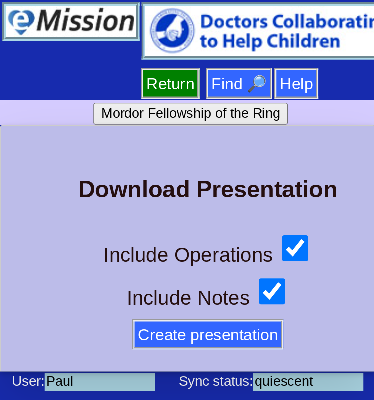
- Creates a full slide show of all patients
- Can include operations
- Can include notes
- Images are included
- Useful for Powerpoint and other slide presentation programs
- Uses PPTX standard file format
- Rather slow process
Archive of Images and Files
This option creates a compressed archive of all the non-text material.
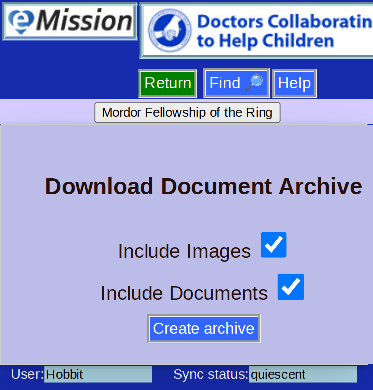
Specifically:
- Pictures
- Patient ID pictures
- Pictures in patient notes
- Pictures in mission notes
- Included files from
- patient notes
- missoin notes
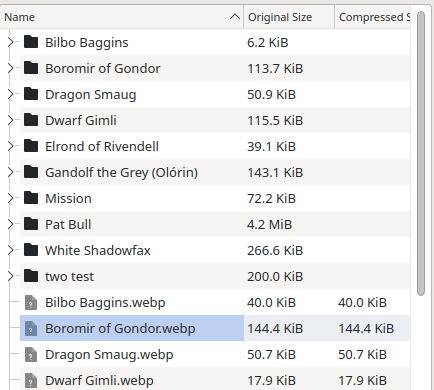
Inside the archive file
- Patient ID photos are in the root directory
- Each patient, and the mission itself, has a folder
- Files are in the appropriate folder
- Pictures are in the approprite folder, labeled by date.
Backup
This option downloads the entire database content in a standard JSON file format.
The information serves as a backup -- in can be loaded into the database program by a server administrator
Images are included as Base64 text -- so rather large
An example of the contents:
Administration
The main administrative task menu

- User Management
- for adding, editing, and deleting users
- needs SuperUser access
- Mission Members
- to modify user access to your mission data
- needs SuperUser access
- Database Console
- Direct database controls on the server
- needs SuperUser access
- Database Information
- metadata provided by the database program
- Merge Patient Records
- specialized routine
Super User (Top level access)
The level allows User administration (Add/Edit/Permissions) and database console access.
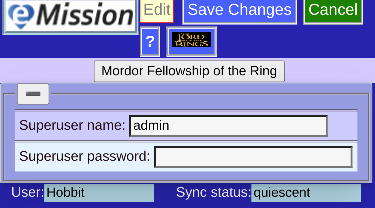
The page pops up automatically when this level is needed.
Enter password and press Save Changes to proceed.
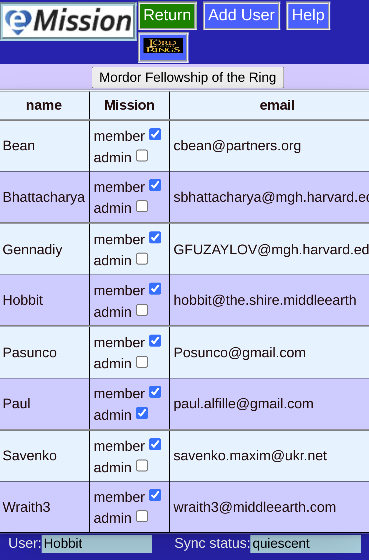
User List
For SuperUser only:
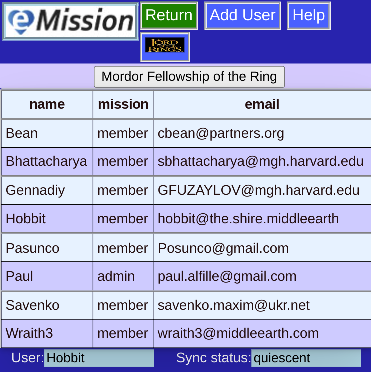
- This shows a list of existing users across all missions
- AddUser at top allows adding a new user (obviously)
- Click on a user's row to edit that user's data
- The User's membership in the current mission is shown:
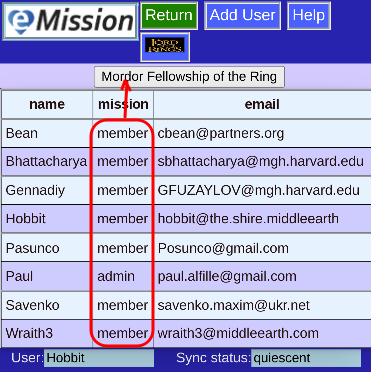
List Users for Membership
A direct way to assign users to your mission
This is a list of members, and their current role on your mission.

Simply check or uncheck membership.
There is also a link to Add User
New User

A blank User Edit form to fill out. Save Changes when done.
You will proceed to Send to User
Edit a User
Once created, you can edit a user's record, with some limitations.
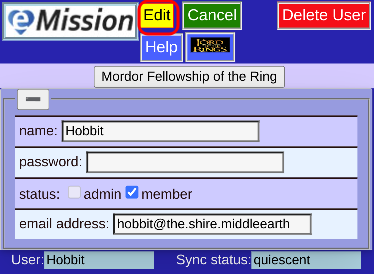
- The user name cannot be changed (but you can create a new user if you wish)
- The Password can be changed, but not retrieved.
- If forgotten it must be created anew
- Leaving the password blank should not reset it
- Status applies to the currently listed mission
Press Edit to modify the record:
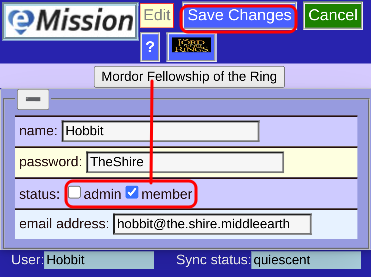
Press SaveChanges to proceed (or Cancel to back out)
Send User Info
After a patient is created or edited, this page is useful for user communication.
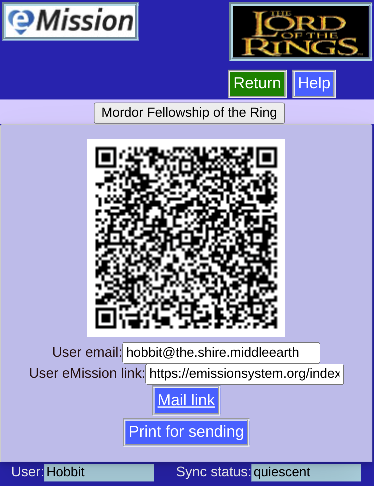
-
Main link can be problematic due to different email clients and modern security restrictions
-
Print for sending produces output like this:
Which can be sent, or saved as a PDF file (if you have that driver on your system).
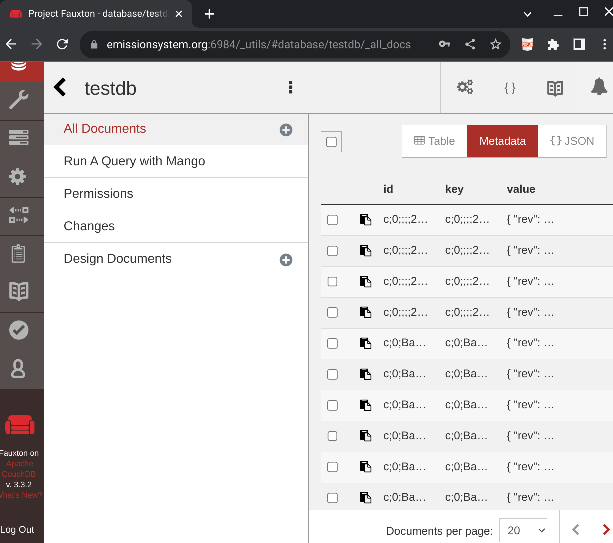
Database Console
This is a link to the Couchdb database administration console on the remote server.
- Internet access is required
- Database Administration access (Superuser) is needed
- Expertise is needed. It is possible to make the whole eMission server not work.
Possible reasons to use this console:
- Create a new mission database
- Edit Users, and permissions (although it is probably easier in the program)
- Direct inspection/editing of records
- Set up replication to a backup couchdb server
Database Information
Some basic database information reported by the database program.
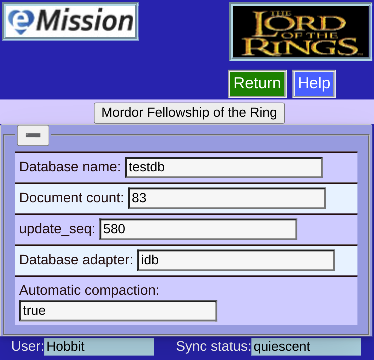
None of the fields are editable.
Merge Patient Records
This is a specialized procedure best left to the mission expert.
Sometimes the same patient was entered twice with slightly different identifiers.
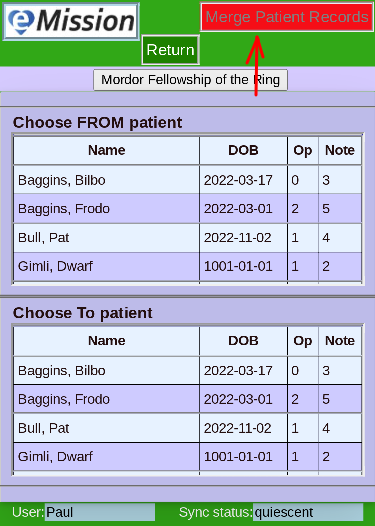
- Two lists of patients are shown (from the mission records)
- The Merge Patient Records button is disabled
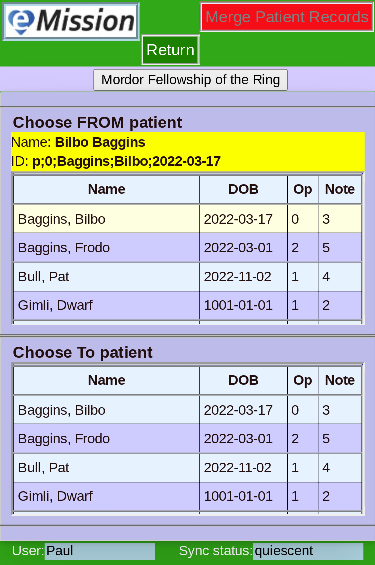
When a patient is chosen, the Name and record id is shown
In this case, Bilbo is a considered a duplicate patient name and we will next choose the patient to move the data to.
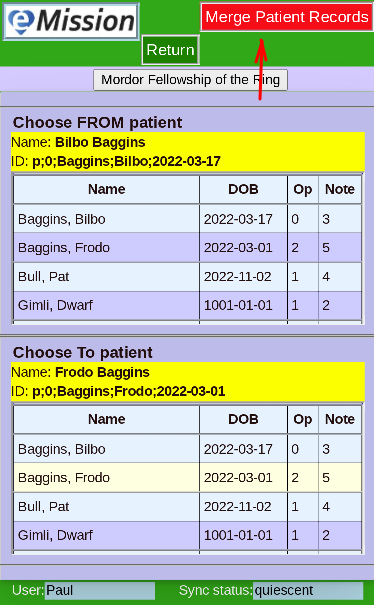
Now a From and To id have been chosen. The Merge Patient Records button is enabled.
Return to change your mind.
News and Publications

Scientific
- Alfille, P., Bean, C. & Fuzaylov, G. Smart phone based medical record software for short term surgical missions. Discov Health Systems 2, 21 (2023). https://doi.org/10.1007/s44250-023-00035-9
Popular
Set Up Your Mission
For a mission organizer that wants to use eMission

Components
Like all mobile software, there is a client and server
- Client
- Lives on phone (or other device)
- Runs in browser
- Downloaded automatically from the Web Site
- Server
- Lives in "the cloud" (or in your data closet)
- Needs to be publicly available on the internet
- Runs the website, database engine, and stores data
- Typically a commercial service with a small monthly cost
Software
All software used is free to use and free to inspect/modify (i.e. Open Source)
Options
- Use our infrastructure (cloud server)
- We maintain the server
- We will manage users
- Database name, descriptions and contents are all yours
- Some cost for supporting infrastructure
- Set up your own server
- We can help with advising and setup
- You will have complete control of users
More details on the following pages
Use Our Server

Description
- Cloud Server
- Unmanaged Server with root access to install software and provision services
- Kamatera provides OS, CPU, IP address, Storage at different tiers ($4/mo lowest level)
- Domain name
- i.e. emissionsystem.org with DNS records pointing to your IP address
- SSL Certificate
- For secure web traffic
- Let Encrypt is free but requires renewing every 12 months
- Operating System
- Ubuntu Server Edition (Linux)
- Software
Setup
Just give us:
- List of databases
- List of users
Cost
Minor, the incremental cost of additional server level
Support
This is a collaborative humanitarian project. We're glaad to help you get started. The "administrator" has a day job, however, and expects that once set up, support should be minimal.
Help with documenting usage, fixes, and "paying forward" by helping new users would be appreciated.
Your Own Server
How to set up your own infrastructure

You may already have an IT infrastructure in place with servers, domain, and some expertise.
While you can duplicate our setup, the following components are what's really needed:
- Public web server
- This will server the code, images and documentation
- SSL encryption is recommended
- No CGI or modules are needed, just straight html
- Duplicating the emission github website as the server document source should be sufficient
- mdbook the document system from the Rust community needs to be run once in server root dir to build html from markdown:
mdbook build - CouchDB needs to be set up
- Excellent documentation, set up as non-clustered
- Suggest SSL (port 6984) and block port 5984
- Couchdb should be in the same domain as the web address, though of course it can be a different machine
Instructions
There are complete setup instructions.
First time
- Set up database (use Fauxton couchdb console)
- Add to database list using an available python script
- Use eMission software (via web browser)
- Set up yourself as a user
- Add mission information
- That's it
Operating system
While the development and deployment has been on Linux, all the software is platform agnostic.
Support and Maintenance
The hope is that eMission will find broad usefulness and support humanitarian efforts throughout the world. So how can you get started or solve problems?
Setup
The authors are happy to help with initial setup (although there are very comprehensive instructions included).
Maintainance
We have found maintainance needs to be small.
- Physical infrastructure
- Server is either a cloud service or a fairly standard desktop-type computer.
- Clients are phones or other portable devices that users already own and maintain.
- Software
- All software components are stable and free. Routine security upgrades of computers should be done.
- Data
- We recommend backups -- which are easy via replication
- Each portable device also contains a replica of it's mission data
- Users
- Adding and managing users should be a small part of typical mission support.
Configuring CouchDb
- Initial setup
- Set up super administrator
- Create database (or replicate from another source)
- Configure SSL
- Make exclusively SSL
- Not directly supported as a configuration option
- Work-around described by Jonathan Hall does not seem relevant to current versions.
- Use the firewall ufw (on Ubuntu)
ufw show listening
ufw default deny incoming
ufw default allow outgoing
ufw allow ssh
ufw allow 80
ufw allow 443
ufw allow 6984
ufw deny 5984 ; non-SSL port -- will block
ufw enable
- Output after firewall change:
# ufw show listening
tcp:
  16407 * (beam.smp)
  22 * (sshd)
   [ 1] allow 22/tcp

  4369 * (/help/epmd)
  443 * (lighttpd)
   [ 3] allow 443

  5984 * (beam.smp)
   [ 5] deny 5984

  6984 * (beam.smp)
   [ 4] allow 6984

  80 * (lighttpd)
   [ 2] allow 80

tcp6:
  22 * (sshd)
   [ 6] allow 22/tcp

  4369 * (/help/epmd)
udp:
Overall architecture
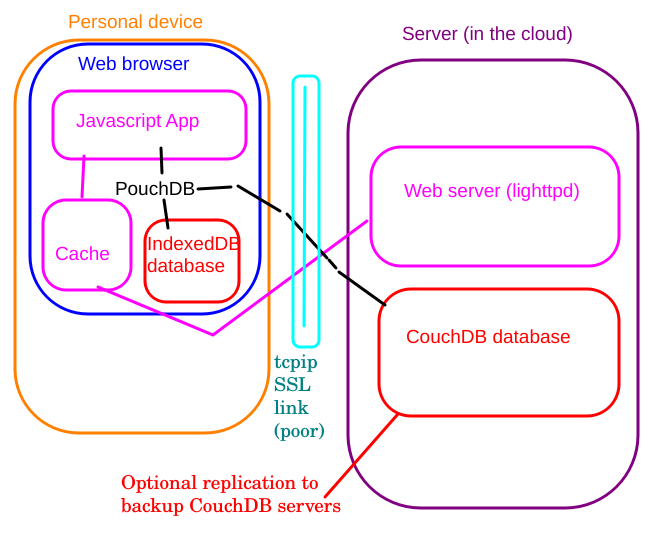
System design
Client-side
- Personal Device
-
- Browser
- Smartphone / Tablet
- Laptop / Desktop / Chromebook
- Intermittent network access
- Browser
- Runs Javascript App (ES11+)
- Service Worker for caching App
- PouchDB (javascript) is in-app database engine
- Browser database (IndexedDB)
- Replicates with Server (CouchDB)
Server-side
- Server function
- Stable DNS address
- Web server and database can be on separate machines
- Web server
- Deliver App and HTML for caching
- Hold non-cached help documents
- Preferably SSL secure
- Implemented using lighttpd although basically any static content web server would work (e.g. nginx, caddy, ...)
- CouchDB server
- Manages database
- Has own Fauxton web console
- Uses http for communication protocol
Communication
- Application (eMission)
- Pure javascript and HTML
- Cached locally using Service Workers
- All dependencies included
- Content
- Cached locally in browser database (IndexDB)
- Replicates opportunistically
- Eventually consistent
- CouchDB replication protocol (by PouchDB)
Contributing code
As an open source collaborative program, eMission welcomes fixes and new features.
Here is a brief guide on contributing:
Code style
- Pure javascript
- ES2016+ style
- Promise rather than await or callback preferred
- Runs in browser
- iPhone, Android and laptop compatible
- No external dependencies (libraries included in eMission download)
- Open source (MIT or GPL or similar)
Presentation style
- HTML and CSS
- Optimized for mobile
Documentation
- Written in Markdown
- Uses mdbook to render HTML
- Links
- Links to eMission implementation welcome, including a description of your mission
- Video and instruction links also welcome
Github
- github is the primary repository
- Fork, modify and push changes
- Use the Issues forum
Cache content
eMission runs as a single-page app with most static content (code, HTML and images) in the browser cache.
Off-line user
eMission is designed for off-line as well as on-line work. It passes the PWA Builder test suite.
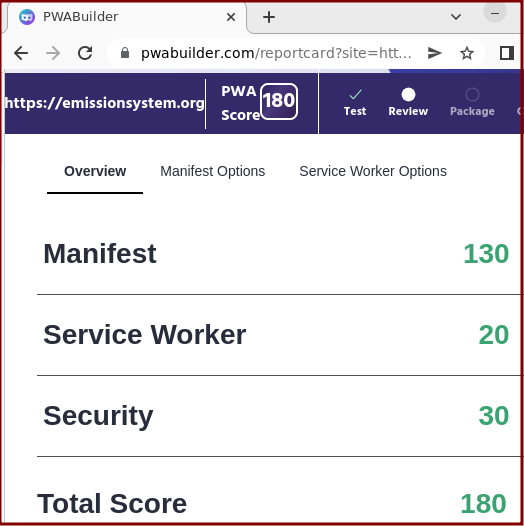
That means:
- All processing is done locally in the browser
- Code, static images and layout is stored locally in Cache
- Content (medical information) is stored locally in the browser database
- When available, the network is queried to refresh code and synchronize changes to content
Service Worker
eMission uses the modern caching technique of Service Workers. eMission uses a simple direct service worker program instead of a framework like Workbox.
The service worker is a long-running background program (in the browser) with persistent storage only in Cache or IndexDb
eMission's service worker startup is:
    // Service worker (to manage cache for off-line function)
    if ( 'serviceWorker' in navigator ) {
        navigator.serviceWorker
        .register('/sw.js')
        .catch( err => console.log(err) );
    }
Code
Contents of sw.js
/* Service Worker with strategy:
    1. Add selected files to cache
    2. Hook into fetch only for those files
    3. Get from network and return plus update cache
    4. Fall back to cache if network fails
    * */

const cacheName = "eMission";
const cacheList = [
    "/",
    "/index.html",
    "/sw.js",
    "/images/DCTOHC11.jpg",
    "/images/emission11-web-white.jpg",
    "/images/emission_64x64.png",
    "/images/emission_t_square.png",
    "/style/NoPhoto.png",
    "/style/base.css",
    "/style/print.css",
    "/js/app.js",
    "/js/flatpickr.min.js",
    "/js/qrenc-4.0.0.min.js",
    "/js/print.min.js",
    "/js/pouchdb-7.3.1.min.js",
    "/js/elasticlunr.min.js",
    ];

// preload cache
self.addEventListener('install', event =>
    event
    .waitUntil(
        caches.open(cacheName)
        .then( (cache) => cache.addAll( cacheList ) )
        .catch( (err) => console.log("Error filling cache",err))
        )
);

// Selected Fetch
self.addEventListener('fetch', event => {
    if ( event.request.method === 'GET' ) {
        let url = new URL(event.request.url) ;
        if ( cacheList.includes(url.pathname) ) {
            event.respondWith(
                fetch(event.request)
                .then( response => {
                    if ( !response.ok ) {
                        throw 404;
                    }
                    let rc = response.clone() ;
                    caches.open(cacheName).then( cache => cache.put( event.request, rc ) );
                    return response ;
                    })
                .catch( () => caches.match(event.request) )
            );
        }
    }
});
Strategy
- A static list of cacheable files is hardcoded in the sw.js file
- all files are loaded into the cache at service worker initiation
- On page load:
- If no network: files are delivered from the cache
- If network but request not in cachable list: File downloaded and delivered
- If network but file download problem: /Files delivered from cache
- If network and download success: Files also copied into cache to update cache content
Comments and enhancements
Storage efficiency
- Total cached content is relatively small in modern terms ( < 1Mb )
- Cache is regularly scanned for outdated files
- Re-writing all files on download might wear out flash storage.
- Enhancement: write-on-change (use a file hash or direct content comparison)
Network bandwidth
- Cached content is only requested at page load, not during routine use.
- Database content is stored separately in IndexDb but uses CouchDb replication protocol for off-line and incremental synchronization.
Currency
- All files are reloaded if available
- Cache is constantly updated
- Losing connectivity during load could give a mix of new and old content (i.e. no generational check)
- Expect that rare change of cached files to minimize this risk
- Enhancement: version control of all cache content (would also reduce need for cache write)
- Enhancement: Package cached files in larger blocks for download efficiency and synchronization
Database Record format
- PouchDB (on the device) and CouchDB on the server are a non-SQL record-based key-value database.
- All records have a
- unique key (ID)
- housekeeping fields for version control and replication
- Application assigned key:value pairs
eMission design used the unique Id as follows:
- Type (Patient,Operation,Mission,Note)
- Version
- unique Patient identifier
- Date
- This allows a patient's records to be grouped together
Patient record
| key | name | type | note |
|---|---|---|---|
| _id | Patient Id | automatic | p;0;Last;First;DOB "p",version,... |
| author | user name | automatic | username of record creator |
| patient_id | patientId | automatic | reference back to this (main patient) record |
| type | record type | automatic | "patient" |
| LastName | Last name | text | required |
| FirstName | First Name | text | required |
| DOB | Date of Birth | YYYY-MM-DD | required |
| e-mail address | email format | in Demographics | |
| phone | phone number | phone format | in Demographics |
| Address | address | free text | in Demographics |
| Contact | contact info | free text | in Demographics |
| Dx | Diagnosis | free text | in Medical |
| Sex | Sex | multiple choice | in Medical |
| Weight | Patient weight (kg) | number | in Medical |
| Height | Patient height (cm) | number | in Medical |
| ASA | ASA class | multiple choice | in Medical |
| Allergies | Allergies | free text | in Medical |
| Meds | Medications | free text | in Medical |
| _attachments:image:data | Image | automatic | binary image data |
| _attachments:image:content_type | Image type | automatic | e.g. png |
Operation record
| key | name | type | note |
|---|---|---|---|
| _id | Operation Id | automatic | o;0;Last;First;DOB;timestamp modified patient_id + creation timestamp |
| patient_id | patientId | automatic | reference back to this patient's main record |
| author | user name | automatic | username of record creator |
| type | record type | automatic | "operation" |
| patient_id | Patient Id | automatic | link back to patient |
| Complaint | Patient presenting complaint | free text | in Medical |
| Procedure | Type of operation | text | |
| Surgeon | Surgeon | text | |
| Equipment | Needed equipment | free text | |
| Status | Scheduling status | multiple choice | |
| Date-Time | Time of operation | date time | if known |
| Duration | Expected length (hours) | number | without turnover |
| Laterality | Left / Right | multiple choice |
Note Record
| key | name | type | note |
|---|---|---|---|
| _id | Operation Id | automatic | c;0;Last;First;DOB;timestamp modified patient_id + creation timestamp |
| patient_id | patientId | automatic | reference back to patient's main record |
| author | user name | automatic | username of record creator |
| type | record type | automatic | "note" |
| patient_id | Patient Id | automatic | link back to patient |
| text | Note text | free text | |
| date | Date | YYY-MM-DD | automatic and editable |
| _attachments:image:data | Image | automatic | binary image data |
| _attachments:image:content_type | Image type | automatic | e.g. png |
Mission
| key | name | type | note |
|---|---|---|---|
| _id | MissionId | automatic | Unique single ID |
| patient_id | MissionId | automatic | reference back to this record |
| Organization | Sponsoring Organization | text | for attribution |
| Mission | This Journey | text | Name of this mission |
| link | Web link | URL | to the mission or organization |
| Location | Country and City | text | Place of mission |
| StartDate | Beginning | Date | of mission |
| EndDate | End | Date | of mission |
| Emergency | Emergency contact | free text | Who to contact -- i.e. local official |
| _attachments:image:data | Mission Logo | automatic | binary image data |
| _attachments:image:content_type | Mission logo | automatic | e.g. png |
Patterns
- Mission record is similar to a patient record
- ID has same number of fields
- Mission Notes have a patient_id field that refers back to it
- There is no analog to Lastname, Firstname or DOB in id
- Only a single mission record per database is allowed
- Mission Notes are similar to patient notes
- Same fields and editing
- no real use of categories
Task split
Optional information -- not required for use
While the majority of the application is a single page, some tasks that take different libraries or different credentials are split out.
There are 3 HTML pages, each with it's own javascript. The CSS styles are universal.
| HTML | libraries | tasks |
|---|---|---|
| index.html | app.js | MainMenu |
| pouchdb | Patient entries | |
| elasticlunr | Operation entries | |
| qrenc | Note entries | |
| printJS | Mission entries | |
| flastpickr | Mission choose | |
| Error log | ||
| Search | ||
| download.html | downapp.js | Download menu |
| pouchdb | JSON backup | |
| pptxgenjs jszip | CSV | |
| Powerpoint | ||
| admin.html | adminapp.js | User management |
| pouchdb | Database console | |
| qrenc | Database info | |
| printJS | Merge patients | |
| flatpickr | Enter credentials |
Process start-up
Low level details for developers
- HTML page is loaded
- index.html
- admin.html
- download.html
- Javascript programs (scripts) are loaded from the HTML page
- support (like pouchdb, printJS, ...)
- eMission program is loaded and started
- Startup tasks (index.html -> app.js)
- Read URL parameters
- credentials
- patient id
- Store in cookies and reload with clean URL
- Get cookies
- credentials (name/password/database/server)
- patientId, operationId, noteId
- navigation path
- Check if in iframe (for PatientMerge)
- Load/Create local database
- start sync with remote database
- check/create secondary indexes
- create search database
- Update some display elements with correct logo and links
- Check if new database or new user needs FirstTime processing
- Check and start navigation path
- Read URL parameters
- Startup tasks (download.html -> downapp.js)
- No URL parsing
- No search
- no iframe
- no queries
- Startup tasks (admin.html -> adminapp.js)
- No URL parsing
- No search
- no iframe
Record IDs
A Coudb/Pouchdb database is structured as a collection of documents organized by a document id. Best practice is to use the document id creatively.
eMission uses the following scheme for document ids:
| Type | Version | Last | First | DOB | DATE |
|---|---|---|---|---|---|
| char | 0 | lastname | firstname | date-of-birth | ISO create date-time |
Each field is separated by a ";"
| Type | description | notes |
|---|---|---|
| p | Patient | no DATE e.g. p;0;Doe;John;2000-01-01 |
| m | Mission | no DATE e.g. m;0;;;; |
| o | Operation | e.g. o;0;Doe;John;2000-01-01;2021-12-29T21:16:39.648Z; |
| c | Note | e.g. c;0;Doe;John;2000-01-01;2021-12-19T21:19:39.658Z; |
Observe that all notes and operations contain the patient's id in their id -- as well as a field called patient_id to help with that link.
The ID scheme also allows retrieving all operations, notes for either a patient or all patients directly.
If a patient is later found to have two different IDs, it is possible to merge with an option in the Administration menu.
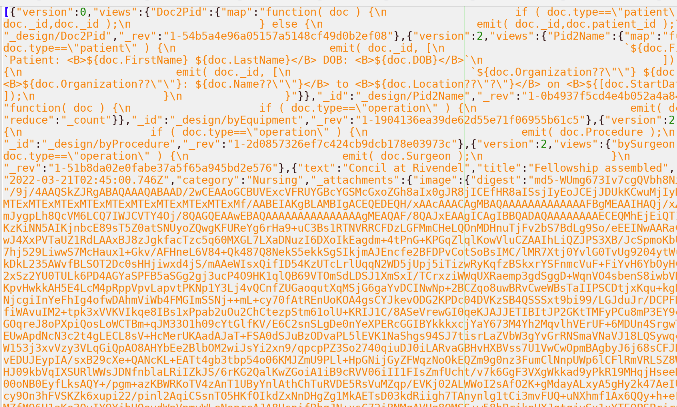
Pictures and Attachments
eMission stores images directly in documents as binary attachments.
For example
{
  "_id": "c;0;Baggins;Bilbo;2022-03-17;2023-05-16T08:58:28.425Z",
  "_rev": "2-5fdbbdc5bcd638163fd1a58d35f50794",
  "text": "Mithril tunic",
  "title": "",
  "author": "Hobbit",
  "type": "note",
  "category": "Uncategorized",
  "patient_id": "p;0;Baggins;Bilbo;2022-03-17",
  "date": "2023-05-16T08:58:28.425Z",
  "_attachments": {
    "image": {
      "content_type": "image/jpeg",
      "revpos": 2,
      "digest": "md5-7jdbRxa6NBVhgIYZZqlDag==",
      "length": 6396,
      "stub": true
    }
  }
}
Under _attachments an entry of image is placed.
- Only images are currently supported
- Only one image per record
- Not all records will have an attachment
| Type | Attachments |
|---|---|
| Note | yes |
| Patient | yes |
| Mission | yes |
| Operation | no |
Source Code
Where
eMission is available on Github under the MIT License. Basically the code is completely open to view, use and modify.
We would appreciate hearing about your implementation and enhancements to help everyone improve.
The DCTOHC actual applicaton is hosted on a commercial cloud server.
Version
The Code is pure Javascript -- 2020 verstion (uses Nullish Coalescing Operator).
External
Included packages are included in the download, so no dependency on external repositories.
Permissions
- Browser database (IndexDB)
- Gallery or Camera access for images
License
MIT License
Copyright (c) 2023 Paul H Alfille MD
Permission is hereby granted, free of charge, to any person obtaining a copy of this software and associated documentation files (the "Software"), to deal in the Software without restriction, including without limitation the rights to use, copy, modify, merge, publish, distribute, sublicense, and/or sell copies of the Software, and to permit persons to whom the Software is furnished to do so, subject to the following conditions:
The above copyright notice and this permission notice shall be included in all copies or substantial portions of the Software.
THE SOFTWARE IS PROVIDED "AS IS", WITHOUT WARRANTY OF ANY KIND, EXPRESS OR IMPLIED, INCLUDING BUT NOT LIMITED TO THE WARRANTIES OF MERCHANTABILITY, FITNESS FOR A PARTICULAR PURPOSE AND NONINFRINGEMENT. IN NO EVENT SHALL THE AUTHORS OR COPYRIGHT HOLDERS BE LIABLE FOR ANY CLAIM, DAMAGES OR OTHER LIABILITY, WHETHER IN AN ACTION OF CONTRACT, TORT OR OTHERWISE, ARISING FROM, OUT OF OR IN CONNECTION WITH THE SOFTWARE OR THE USE OR OTHER DEALINGS IN THE SOFTWARE.
Packages Used
All these packages are Open Source. The client-side code is actually included in the repository rather than from an external source which ensures availability and security.
Client Side
| Package | Version | Licence | Perpose |
|---|---|---|---|
| eMission | MIT | Main source code | |
| PouchDB | 8.01 | Apache-2.0 | Database engine |
| qrenc | 4 | MIT | QR code generator |
| Elasticlunr | 0.96 | MIT | Text search |
| flatpickr | MIT | Date routines | |
| PptxGenJS jszip | MIT | Powerpoint generator | |
| PrintJS | 1.6.0 | MIT | Printing |
Server Side
| Package | Version | Licence | Perpose |
|---|---|---|---|
| CouchDB | 3.3 | Apache-2.0 | Replicating database |
| mdbook | MPL-2.0 | Documentation framework | |
| lighttpd | 1.4.70 | BSD ? | Web server |
eMission shows the power of leveraging Open Source code!
Author and Support
Proposal and Requirements
- Gennadiy Fuzaylov MD
Design and Coding
- Paul Alfille MD for eMission
- Various authors for other components
Documentation
- Scientific: Chris Bean MD
- User: Paul Alfille MD
Support
- Doctors Collaborating to Help Children for cloud server and domain registration funding
Contact
Security
Summary
eMission is a distributed database with a central server component and a field-based handheld or laptop component. While the system is aimed at ease of use in poorly connected environments, there are moderate security safeguards on data.
HIPPA
The Health Information Privacy Protection Act is a U.S. statute that requires health information access be restricted and privacy maintained. eMission satisfies some of the components ( secure transmission, authentication ) but full HIPPA compliance is an broader organizational protocol that requires certain policies, record keeping and other aspects beyond the of scope of eMission.
System components
Central database
- Should be in a physically secure environment.
- Runs on a (typically) linux instance either on the cloud or a central office
- The root user should have separate access from the database administrator, and be managed by ssh (OpenSSH) secured console.
- The database, couchdb is password secured for administrative and user access.
- couchdb offers database-level rather than record level control.
- Database administrative access is by password protected SSL web console.
- Database transactions to the field are by SSL-secured communication.
- Database replication for backup to an off-site server is easy to set up.
Communication
- All database and application communication is over https (SSL-secured) protocol.
Remote access
Setup
- Initial setup, including credentials are transferred as a URL.
- Modes of transmission include e-mail, QR code, or paper
- Revoking credentials only removes data changes, existing data is accessible locally.
Physical
- Any device with a modern web browser and at least sporadic network connection.
- Physical security is dependent on keeping the hand-held device at secured, and using device-based authentification. (E.g. password, fingerprint or face recognition.)
Software
- All transaction is within web browser (Google Chrome, Safari, Firefox, Edge, Opera) -- ECMAScript 11 level support required (~2017)
- Local copy of database and application is stored on the browser for PWA (Progressive Web App) support. Typically in browser cache for code, and indexDb for data.
- Software is completely provisioned from single site -- no content delivery networks or dependency chains.
- Communication is via SSL-secured web traffic.
Threats
- Eavesdropping and man-in-the-middle: Unlikely with SSL communication with public key credentials
- Data at rest: Secure on server, vulnerable on remote device
- Reading data: Possible with access. Revoking access only revokes seeing forward changes.
- Changing data: Possible with access (revocable)
- Auditing changes: Yes (built into couchdb design)
Possible Enhancements
Remote
Since the application lives entirely within the browser, using third-party browser-securing techniques will be effective:
- At-rest encryption (remote) (pouchdb add-on or browser add-on)
- 2-factor or biometric authentication using add-on products
Central
couchdb is a stable product with excellent security history. By design, access is whole-database granularity.
- At-rest encryption (server) using encrypted file-system
- Security techniques for remote administration access
- Swapping couchdb for alternative more-secure databases (IBM Cloudant, etc) that support the same replication protocol should be possible with only minor changes to initial access logic.
Build your own server
This section documents the actual steps for setting up your own eMission server. As We assume considerable server management experience.
There are simpler ways to set up a mission. Specifically using existing infrastructure.
Basic Structure
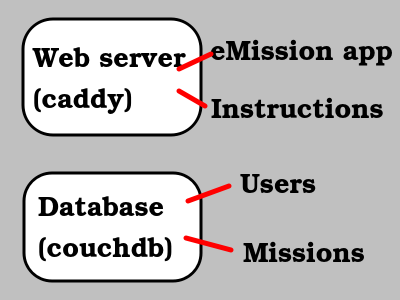
At the most basic level, implementing a web server, and a database that follows couchdb protocol is sufficient. Even the Instructions can be served from the original site with appropriate server redirect.
Current Implemented Structure
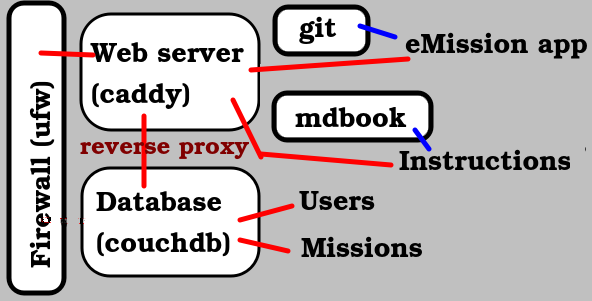
For better maintainability and security, the actual implementation includes:
- Firewall
- locks down server (optional but safer)
- git
- easy update of code and markdown documentation
- mdbook
- build html from markdown
- Web server
- Implements SSL encryption of application and data
- Filters database access (reverse proxy) to isolate from external attack
- All communication goes through Web Server
- Web Server has high-quality SSL implementation
- Serves Javascript application and instructional HTML
Prior Implemented Structure
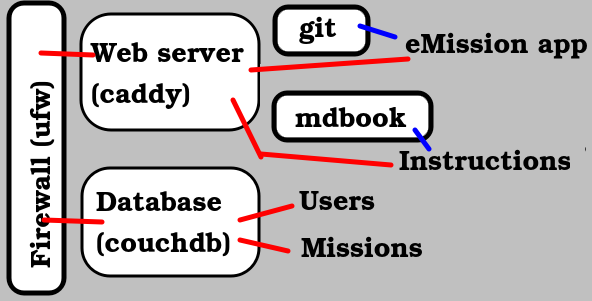
Prior implementation included external access to CouchDB:
- Firewall
- filters non-SSL access to couchdb
- Web server with SSL certificates
- CouchDB with SSL certificates
Platform
eMission developement and server implementation has been on Linux (a very common server platform). The following instructions will assume linux.
There is no reason why a Windows server could not be used for eMission server deployment. All the components have windows versions. There will be differences in the file structure, service initiation, and software packaging.
If you do build on Windows, please share your experience.
Hosted or physical
The eMission server needs to be publically acceesible from the internet with a known address (either fixed IP address or DNS entry).
Organizations with dedicated IT staff and resources may find it easiest (and more in keeping with insitutional policy) to host the server internally. The required hardware resources are small and ongoing management minimal.
Quite possibly, your volunteer organization will not have an existing infrastructure and will want to out-source server provisioning and management. The advantages are:
- Minimal startup cost
- Predictable ongoing cost
- Easy termination
- Vendor manages physical assets, backups and networking
Virtual Private Server
Cloud services are commonplace for a number of functions like web hosting, ecommerce and storage. All these services typically offer an easy front-end application for their function (like a "web builder").
Building an eMission server will require more customization. These pages will document the steps.
Unlike more common services, we will start with a bare setup and install and configure the components stepwise. This setup has a number of names but Unmanaged VPS (Virtual Private Server) is commonly used.
Besides the advantage of complete control, unmanaged VPS are typically cheaper than managed options.
Essential information for setup
For our server configuration, we'll need 4 pieces of information
- IP Address
- ip_address
- In format of "dotted quad"
- e.g. 52.144.45.14
- Provided by your VPS provider when you create a cloud server
- Domain Name
- domain_name
- Chose from a domain name provider
- e.g. emissionsystem.org
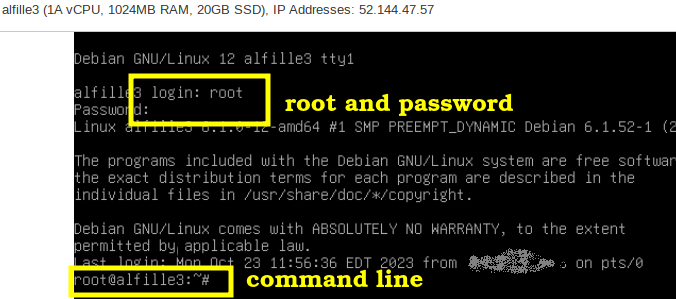
- Server password
- server_password
- "root" will be your user name, the sever superuser
- after initial setup, the need for console access to the server should be rare
- Used for ssh (secure shell) remote access to the server
- Database administrator password
- database_password
- user name is admin
- used in
- couchdb setup
- mission creation
- administrative tasks
VPS Provisioning
An unmanaged VPS is typically a shared virtual computer hosted on the cloud provider's infrastructure. They allow you to choose:
- Number of cores
- Size of RAM
- Size of hard disk
- Network bandwidth
- Level of service (guaranteed or average)
- Operating system and version
- Extras
- Backups
- Domains
- Host geographical location
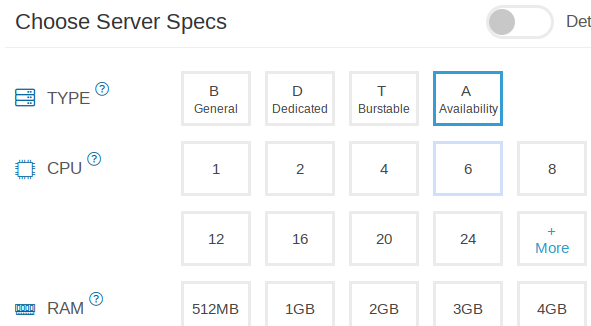
In this case, we choose:
- 1 CPU
- 1GB RAM
- 20GB Hard Disk
- Debian 12 operating system (linux)
The fee is $4/month. (This is from Kamatera, although roughly similar deals are available from other vendors).
Domain name will be extra.
An IP address, SSH and web console access are provided as well. There is also a management screen with overall statistics on usage.
Essential information:
Make note of the provided ip_addess to assign to your domain
At this time, you will also be asked to create a server_password
Domain Name
Your domain_name is a globally unique address to your site. An example is emissionsystem.org.
- The domain comes from top level registrars. Obviously it is best if it matches your organization, and has a recognizable top level like org or net. There is typically a fee for the name ($15-$30 /yr).
A number of vendors (icluding quite possibly your VPS provider) will help you find, purchase and manage your domain. We use Hostinger
Although other services will likely be offered (email addresses, web hosting) the main requirement is to edit your DNS record:
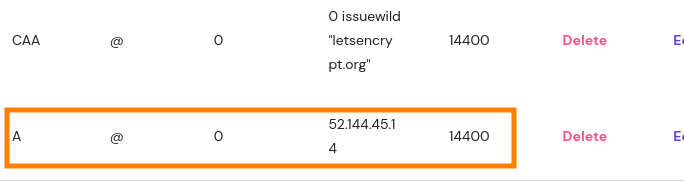
Specifically, find the "A" record and place your VPS' ip_address address there. That way, all queries to that address will be forwarded to your VPS server's network port.
Essential information:
The domain_name which is assigned to your ip_address
General design
Programs
| Function | Program | Packaging |
|---|---|---|
| operating system | Debian 12 | From VPS provider |
| console access | ssh | Built into operating system |
| user: root | ||
| password:server_password | ||
| Firewall | ufw | apt |
| Packaging | snap | apt |
| Documentation | mdbook | snap |
| Application | eMission | git |
| Web server | caddy | apt |
| Database | couchdb | snap |
Arrangement
Initial Server Steps
Access to Server
Several way to access the server, all from the "command line"
- Physical console
- Provider web console
- SSH (Secure Shell)
Logging In
SSH
# Example for acccessing server "alfille.art"
ssh root@alfille.art
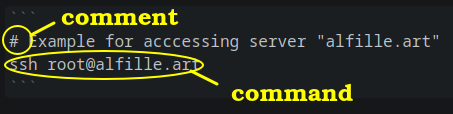
Here is an example of a command -- in this case the actual command to access the server.
- alfille.art is the domain_name
- you will be prompted for the server_password
- comments start with "#" and are only present to make the instructions clearer * you don't need to include comments
All other examples will be on the server, after logging in.
####Web Console
Initial software update
apt update
apt -y upgrade
Install needed software
apt -y install ufw git caddy snapd
Install your favorites
Here is a chance to install your personal favorite software. Most commonly this will be a file editor (like vim or emacs). The included simple editor is nano which is more than adequate.
Firewall
We will use a firewall to protect our server.
Ports to allow:
- ssh secure shell access: port=22
- web server:
- regular port=80
- secure port=443
- couchdb database
- port=5984
- secure port=6984
- Both will be secured via reverse proxy by web server
Setup
If you have followed the setup sequentially, ufw should already be installed. Otherwise use the steps in initial setup to access the server and install ufw
Configure and start
# open ports
ufw allow ssh
ufw allow 80/tcp
ufw allow 443/tcp
ufw allow 5984/tcp
ufw allow 6984/tcp
# start and test
ufw enable
Test
Input:
ufw status
Output:
Status: active

To                         Action      From
--                         ------      ----
22/tcp                     ALLOW       Anywhere
80/tcp                     ALLOW       Anywhere
443/tcp                    ALLOW       Anywhere
5984/tcp                   ALLOW       Anywhere
6984/tcp                   ALLOW       Anywhere
22/tcp (v6)                ALLOW       Anywhere (v6)
80/tcp (v6)                ALLOW       Anywhere (v6)
443/tcp (v6)               ALLOW       Anywhere (v6)
5984/tcp (v6)              ALLOW       Anywhere (v6)
6984/tcp (v6)              ALLOW       Anywhere (v6)
Snap container management
snap is a "container" system that encapsulates and somewhat isolates a complex program. We will use it for 2 or our services:
- mdbook
- CouchDB
While it is certainly possible to build those programs from freely available source code, there are some complex dependencies that make the process rather tedious.
Setup
If you have followed the setup sequentially, snapd should already be installed. Otherwise use the steps in initial setup to access the server and install snapd
Reset console
First, unlike other installation steps, snap needs you to log out and log back in to your server. (This is to make sure that your $PATH is set correctly so snap programs can be found).
More setup
snap install core
MDBook Documentation Server
Background
mdbook is a documentation system, written for the rust language, that makes creating an instructional website easy.
- Content is is markdown format -- an easy wiki-style text with formatting
- Navigation structure is specified in the
SUMMARY.mdfile - Markdown files are in the
srcsubdirectory - Images are in the
imagessubdirectory ofsrc mdbook buildtranslates content to html in thebooksubdirectory
Installation
Future state, using snap when updated
The snap version of mdbook (v0.0.28) doesn not support the features we use, so use direct binaries
If you have been following the setup steps sequentially snap should have been install already.
snap install mdbook
Current state, using direct binary importqqq
wget -c https://github.com/rust-lang/mdBook/releases/download/v0.4.35/mdbook-v0.4.35-x86_64-unknown-linux-musl.tar.gz -O - | tar -xz
mv mdbook /usr/bin
Usage
Use mdbook every time you update the code or documentation in the github repository. If you've "forked" the repository to customize, use that repository version instead.
Obviously this is after you've done the initial directory creation and code pull.
# go to web directory
cd /srv/www
# pull in changes
git pull
# rebuild HTML structure from Markdown
mdbook build
Test
Input:
mdbook --version
Output:
mdbook v0.4.35
eMission Code
eMission will be served from the /srv/www/ directory -- this is the actual application code and instructions.
Setup
If you have followed the setup sequentially, git should already be installed. Otherwise use the steps in initial setup to access the server and install git
Initial setup
We will clone the eMission repository into /srv/www and later update by pulling changes into that directory.
Note that you can fork the eMission repository, make changes, and use that repository instead.
# Clear out any existing web content
cd /srv
rm -rf www
# Pull in code
git clone https://github.com/alfille/eMission www
Initial Build and Update of eMission
For simplicity, we'll use the update code for the first time as well as all subsequent times:
# Go to website directory
cd /srv/www
# Pull in updated version
git pull
# Rebuild HTML structure from Markdown
mdbook build
Couchdb Database
There are several ways to install couchdb on your server, but the clearest and easiest is via snaps. Our reference is this 2023 Cyrus Brett article.
Password
You will need your couchdb administrator database_password
couchdb administration:
- username: admin
- password: your database_password
Prerequisite
If you have been performing the server setup sequentially, snap will already have been installed.
Install software
# Set snapd to start automatically
systemctl enable --now snapd.socket
systemctl status snapd
# install snap components
snap install couchdb
Now we will change the configuration file
nano /var/snap/couchdb/current/etc/local.ini
and change the 3 lines:
[chttpd]
;port = 5984
;bind_address = 127.0.0.1
to
[chttpd]
port = 15984
bind_address = 127.0.0.1
Note that we've changed the port from the default 5984 to 15984 to make reverse proxy easier.
Basic setup and start of couchdb
snap set couchdb admin=database_password
snap connect couchdb:mount-observe
snap connect couchdb:process-control
snap start couchdb
where you substitute your real database_password
Test installation
Input:
wget localhost:15984 -O-
Output:
Resolving localhost (localhost)... 127.0.0.1
Connecting to localhost (localhost)|127.0.0.1|:15984... connected.
HTTP request sent, awaiting response... 200 OK
Length: 247 [application/json]
Saving to: ‘STDOUT’

-                                0%[                                                     ]       0  --.-KB/s               {"couchdb":"Welcome","version":"3.1.1","git_sha":"ce596c65d","uuid":"27448ab2956df57e98f006406bd8da31","features":["access-ready","partitioned","pluggable-storage-engines","reshard","scheduler"],"vendor":{"name":"The Apache Software Foundation"}}
-                              100%[====================================================>]     247  --.-KB/s    in 0s

2023-10-24 13:09:54 (32.5 MB/s) - written to stdout [247/247]
Current Status
We now have CouchDB running, but we can't access it until we set up our web server.
Caddy Webserver
Synopsis
The caddy webserver will serve both application, web pages, and indirectly data from the database. It will also automatically aquired and keep current security certificates allowing secure SSL communication.
Installation
If you've been following these instructions sequentially, caddy should be already installed.
Configuration
Caddy is configured by a Caddyfile at /etc/caddy/Caddyfile
Initial contents:
# The Caddyfile is an easy way to configure your Caddy web server.
#
# Unless the file starts with a global options block, the first
# uncommented line is always the address of your site.
#
# To use your own domain name (with automatic HTTPS), first make
# sure your domain's A/AAAA DNS records are properly pointed to
# this machine's public IP, then replace ":80" below with your
# domain name.

:80 {
        # Set this path to your site's directory.
        root * /usr/share/caddy

        # Enable the static file server.
        file_server

        # Another common task is to set up a reverse proxy:
        # reverse_proxy localhost:8080

        # Or serve a PHP site through php-fpm:
        # php_fastcgi localhost:9000
}
Edit or copy /etc/caddy/Caddyfileto:
domain_name {
        # Set this path to your site's directory.
        root * /srv/www

        # Enable the static file server.
        file_server
}

domain_name:5984 {
  reverse_proxy localhost:15984
}

domain_name:6984 {
  reverse_proxy localhost:15984
}
Where domain_name is your actual chosen domain_name
Startup
caddy fmt --overwrite /etc/caddy/Caddyfile
systemctl enable caddy
systemctl status caddy
Test -- web service
From your web browser go to address domain-name (your chosen domain name)
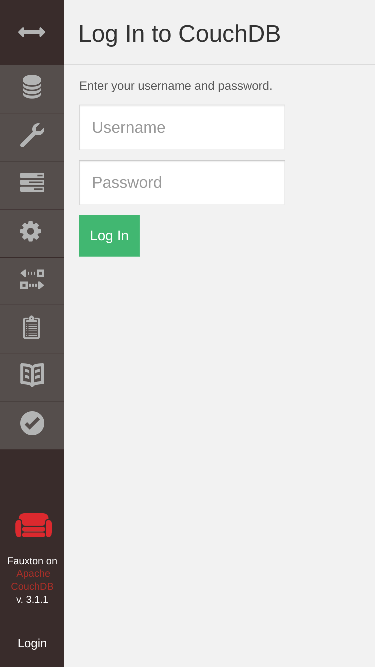
Test -- database service
From your web browser go to address domain-name:6984/_utils/ (using your chosen domain name)
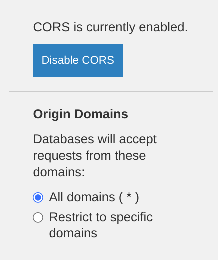
CORS
There is one more step (besides adding databases, data and users) to allow eMission to function on your new server.
CORS background
For security, modern browsers restrict getting data from another website to protect users. CORS or Cross Origin Resource Sharing is a protocol that helps negotiate that sharing.
Although your server is providing both the web content and database, since they use different TCP ports, we must enable CORS
Admin Console
Use your web browser to go to _https://domain-name:6984/utils/
example: https://eMissionsystem.org:6984/_utils
Sign in with
- Username: admin
- Password: database_password
Go to Settings->CORS
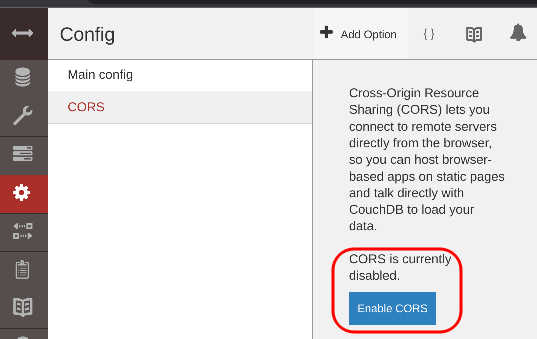
Enable CORS for all domains (easiest)